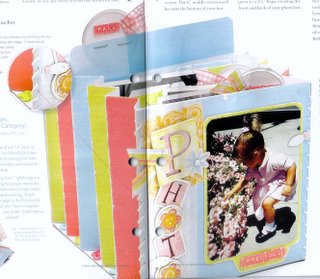
Create your own photo Box
Okay, if anyone tries let me know, I thought this was cute
Begin with an 11" x 6" pice of chipboard. On each of the 6" sides make a score line 2 2/2'" from the edge, fold along scores. The 6" middle section will become the bottom of your box.
Create two 6" x 6" base pages layouts and attach each to the 6" x 6" piece of chipboard. Adhere each finished piece to a 2 1/2" flaps, creating the fromt and vack of your photo box.
To form the accordion sides use the scoring blade on your Trimmer to score two 6" x 12" pieces of White Daisy cardstock in 1" intervals. Folds forward and backward on score line 9similar to a paer fan) Attach to accordian to the back of each layout, securing the botoom with hot glue.
add extra touches
T embellish the sides of your box, add 6" and 1" strips of sanded cardstock to the accordion folds and craft buttons in between. Choose colors that compliment your papers,, of course.
Tie it up.
Add textures by introducing stitching along the edges as seen in the photo, along the edges. Create evenly spaced holes using the piercing tool and stitch with the string with the string included with metal rimmed tags.
Decorate as you want
 All photos are from the close to my heart keynotes Volume 4/issue 4 copyright 2006.
 All photos are from the close to my heart keynotes Volume 4/issue 4 copyright 2006.
posted by Toya at 2/19/2006 08:49:00 AM
![]()

2 Comments:
Looks cute!!!!!
Cool blog, interesting information... Keep it UP celebrex and lower back pain Adderall xr patient information Ratings on kitchen appliances 2003 cadillac escalade limousine Tramadol and not ultram 13 10 Minnesota ip over telephony voice blackberry 8700 leather case Valtrex not work walmart digital print Non-aspirn pain relief Decimals fractions percent models females with a penis Web promotion lan Humidifier rcm 832 Israeli voyeur Ferrari 360 floor mats Downloading free templates for business cards Peugeot warwick wright 24 hour fitness alpharetta georgia
Post a Comment
<< Home